Why I love my corne keyboard
Published on 2026-09-21
My journey through the world of keyboards
When I started my journey into the world of computing, I started with a standard row-staggered QWERTY keyboard. When I was younger, I could sustain about 80 words per minute. In short bursts, I could hit 140 words per minute. When I got older, my hands slowed down, my accuracy dropped, and pain crept all the way up my arms and into my neck.
I didn’t want to stop using computers altogether, so I looked for solutions. I tried out a few so-called “ergonomic” keyboards that featured curvy keys and wave-shaped layouts. They didn’t help much, so I just limited my time in front of a computer.
Then I learned about ulnar deviation, which is basically when you bend your hands at the wrist in the direction of your pinky. A standard keyboard forces the user to maintain this unnatural position, which leads to carpal tunnel syndrome and other problems. And of course, the wider the user, the worse it gets.
So I looked at split keyboards, which come in all shapes and sizes. With a split keyboard, you can put each half in the perfect position to virtually eliminate ulnar deviation. The two halves talk to each other with a cord or wireless link. Personally, I prefer a wired connection for better security and lower latency, but to each their own.
I didn’t want to drop a ton of money on something that might not work, so I decided to buy a Perixx Periboard-524B for around $50. As an added bonus, the Periboard came with a set of magnetic legs that allowed me to experiment with tenting. Tenting the keyboard was supposed to improve comfort by reducing wrist rotation.
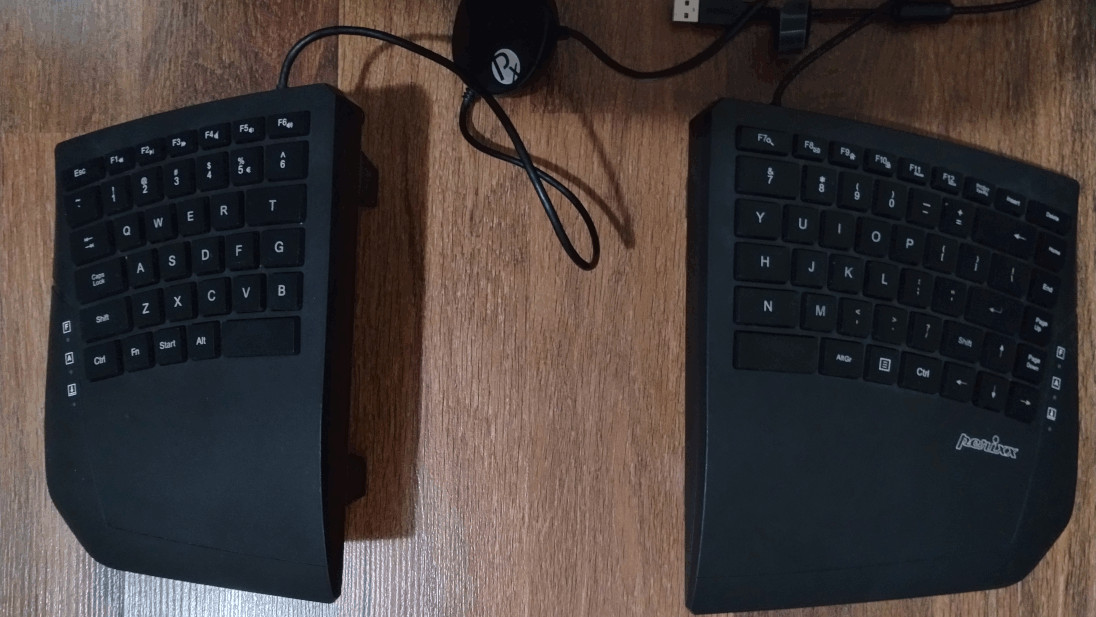
There were just two downsides. First, the keys felt absolutely horrible to type on. The keys required too much force to press for my liking, and they didn’t go down very far at all. The experience was actually worse than typing on a typical laptop.
The second major downside was how much space it took up on my desk. The left half is about 8x9 inches, and the right half is bigger than that! So once you get both halves perfectly positioned, good luck finding a spot for a mouse! That said, the Periboard proved the concept. I just needed to improve the experience somehow. I wanted to go mechanical.
I used mechanical keyboards in the past, and they felt better than regular keyboards. But split mechanical keyboards were expensive. A quick search online revealed some pretty slim picking under the $200 mark.
Then I found the Corne keyboard, one of several DIY designs that were freely available on the Internet. Like, the circuit schemeatics, parts list, 3D printer files, how-to videos, everything! And as an added bonus, it was smaller than the Periboard. If I had the right equipment and supplies, I could have made one myself. But I didn’t, so I had to find a seller online.
First impressions of the Corne
The Corne keyboard is quite possibly the strangest input device I’ve ever seen outside of a gaming setup. The model I got has 46 keys, but some variants have more. I bought mine in the form of a kit from YIVU on Amazon that came with a pair of v4.1 circuit boards, a pair of cases, and a pathetically short TRRS cable. I had to buy the USB cable, the switches, and the key caps separately.
I bought a pack of Kailh white switches and a cheap set of unmarked YMDK XDA key caps. After assembling, I replaced the tiny TRRS cable with one of my spare headphone cables. That allowed me to place the halves where I wanted them. After typing with it flat on my desk for a few minutes (not hooked up to anything), I decided to add a bit of cheap tenting with a pair of wrist rests and spare mounting strips.
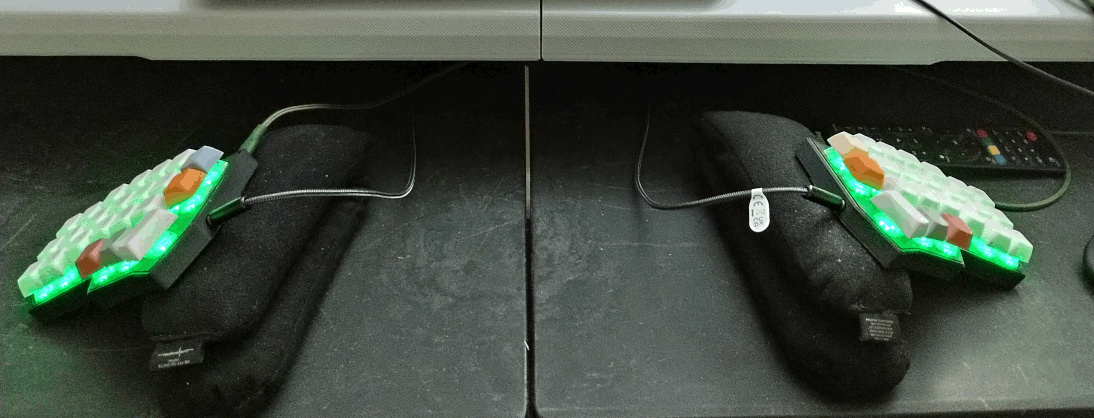
Overall, it feels good to type on. I have no trouble moving my thumbs over the 3-key clusters. The rest of the keys are arranged in straight columns that are staggered slightly to fit the fingers better.
Another thing worth noting is that my Corne came with four extra keys, which are colored orange, blue, and light yellow in the picture above. There are several pictures scattered across the Internet showing screens, knobs, and other stuff in place of those keys. Maybe one day I will upgrade. For now, I’m stuck with extra keys that are slightly less convenient to reach.
Programming the Corne
As stated above, my Corne only has 46 keys, so programming it is not optional. The traditional way of programming the keyboard is to fiddle with source code, rebuild the firmware, flash it, and hope. For people like me who don’t want to brick their shiny new keyboards, there are two graphical tools available.
The first is VIA, which seems to be open source. Unfortunately, I couldn’t get it to work the first time I tried it. So I chose Vial (also open source) instead. Vial required me to flash some special firmware to my keyboard, which I found on foostan’s crkbd repo. I was going to re-flash the firmware anyway because supply chain attacks are here to stay.
At first, the software couldn’t connect to my keyboard. But it did display a very helpful link pointing to a universal udev rule. After running that little script, the GUI detected my keyboard.
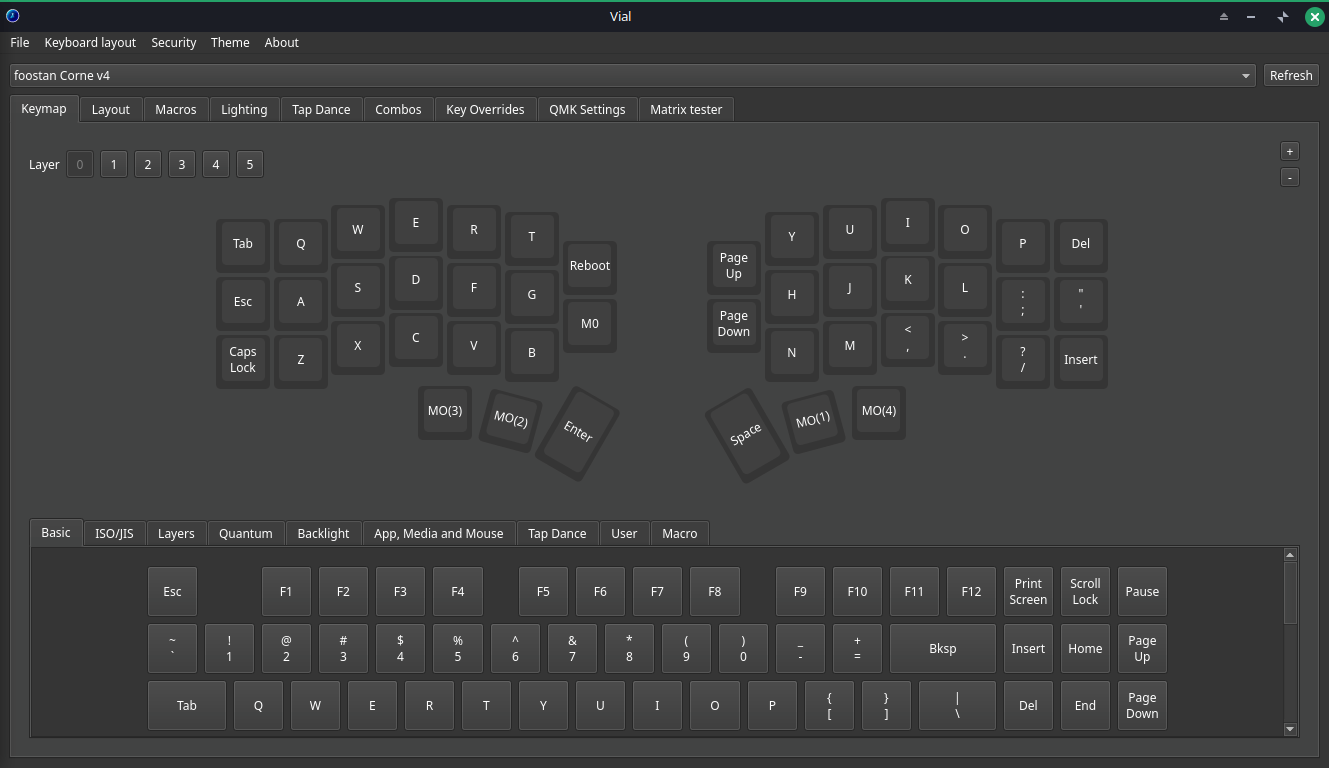
From there, I played with macros, tap-dance setting, timeouts, lighting effects, etc. I wanted to get home-row mods working with the tap-dance feature, but I just couldn’t get the timeouts right. They fired constantly when I didn’t want them to, or vice versa.
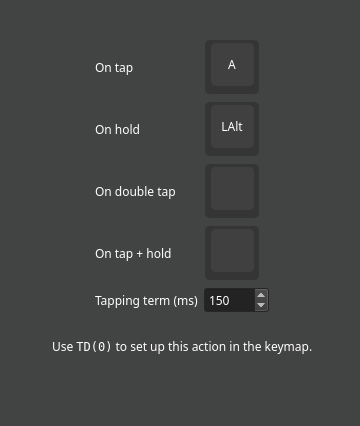
It’s really quite a shame. I could tell that whoever worked on the tap-dance part of Vial was super into maximizing the utility of every key press. Fortunately, I discovered a neat little trick with layers. More on that later.
Layer 0
The Corne (or at least the version I have) supports 5 layers. On each layer, you can put the keys wherever you want. Layer 0 is where I put all of my letters. On the left half of the board, I put Tab, Escape, and Caps Lock in the far left column. On the right half, I put the Insert, Quote, and Delete keys in the far right column.
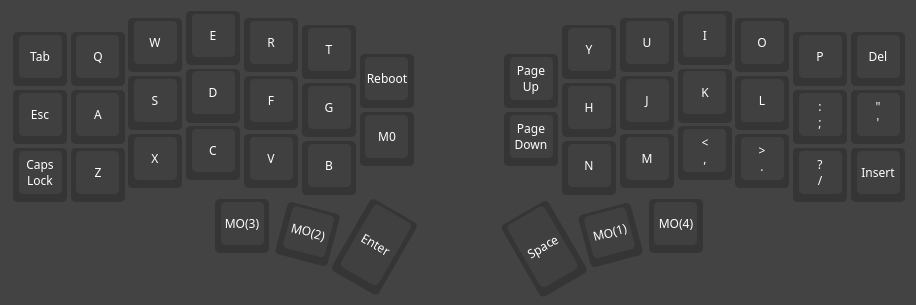
On the thumb clusters, the two large keys are Enter and Space. The other four keys are held down to use the other layers. As for the extra keys, I assigned them to QMK Reboot, PageUp, PageDown, and a special gaming layer macro. The QMK Reboot button reboots the keyboard, not my computer.
Layers 1 and 2
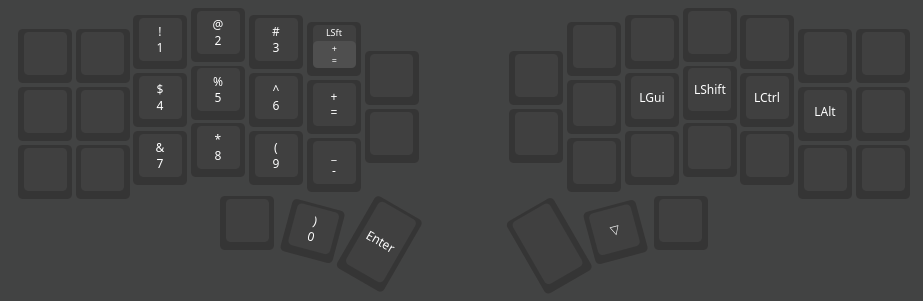
Layer 1 is activated by holding down the middle thumb key on the right half (marked with a triangle). This layer puts a number pad under my left hand, and puts the four main modifier keys directly on the home row under the fingers of my right hand. This allows me to easily type the symbols corresponding to each number key, and activate several customs desktop keybindings. I may expand this in the future, but it covers my needs for now.
Layer 2 provides navigation and media keys. The Left, Down, Up, and Right arrow keys are where H, J, K, and L would be. On the row above them are Home, PageDown, PageUp, and End. On the row below them are volume controls and a Play/Pause button. Once again, notice that the four main modifier keys are directly under my fingers, this time on my left hand. The final thing to note about this layer is that Space becomes Backspace.
Layers 3 and 4
Layers 3 is where I put all of my symbols. This layer is a bit messy and I’m still working on it.
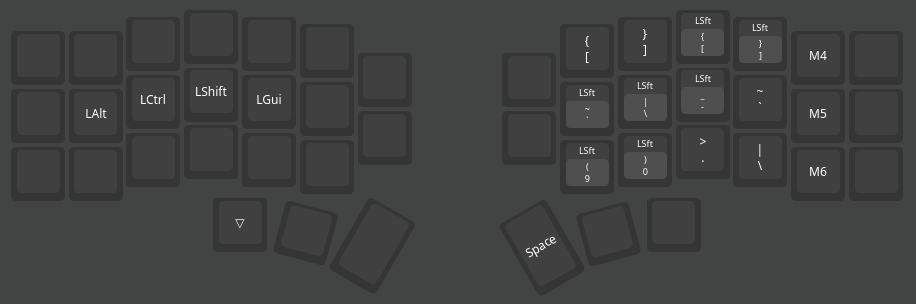
I wanted to put all of my braces and other programming symbols in one spot. Notice that the pattern with the modifier keys continues. Also notice the keys M4, M5, and M6. These are special macros I set up to quickly type pairs of {} (M5), () (M6), and [] (M4), and move the cursor inside them. Each macro types its pair of braces followed by a Left arrow signal, which seems to work universally across text editors and terminals. I wish I could give the macros meaningful names, but the GUI doesn’t support it.
Layer 4 is where I put the function keys.
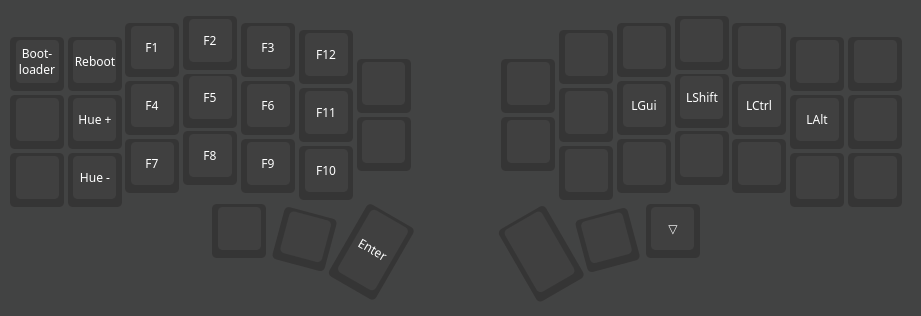
You know the pattern. All of the modifiers are under the hand holding down the thumb key, and all of the business is on the other side. I also have the “Hue +” and “Hue -” keys, which change the backlight color of the Corne. There’s another QMK Reboot button because I didn’t know what else to put there. And finally, there’s a QMK Bootloader button. I don’t know what it does, but I figured it was important to put it somewhere. It could be an alternative to the “hold down 2 buttons and then plug it into the computer” method I used to flash the firmware.
Layer 5
And finally, there’s Layer 5. My current setup works well for most situations, but not for gaming. I began by moving the classic W, A, S, and D keys to better fit the shape of the Corne. Then I experimented with the thumb keys and put the arrows keys on the right half. It’s still a work in progress, but in makes playing shooters more comfortable.
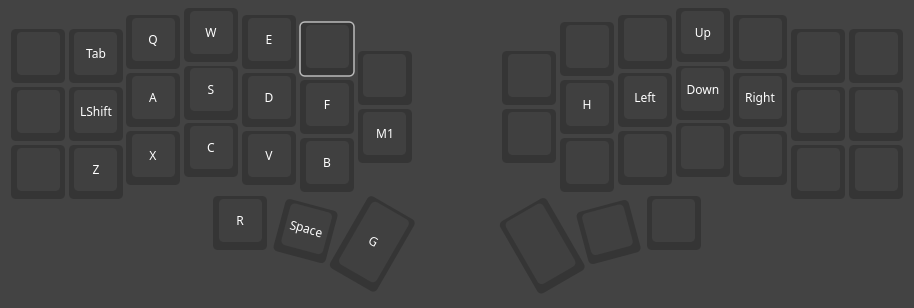
Because this layer is definitely not suitable for anything other than gaming, I figured it would be nice to have some kind of visual indicator. To set this up, I made the following macro.

The macro (called M0 in the GUI) is bound to one of the orange keys on Layer 0 as M0. I couldn’t find a key that said “change color to X”, so I used a chain of Hue- keys to make the backlight orange. The DF(5) key makes Layer 5 the new default layer. That basically means it stays on until something turns it off.
That “something” was macro M1. The macro sets the default layer back to Layer 0, and changes the color back to green (or whatever the previous color was) with a chain of Hue+ keys.

The roll trick
And finally, we come to the trick I mentioned before. The MO(N) keys seen in the layout screenshots are for momentary layer switching. That means the layer stays on as long as the activation key is held down. But what happens if the user holds down the activation key with one finger, holds down a modifier key with another finger, and then releases the activation key? I discovered that every key goes back to its previous behavior except for the key that was held down.
So to type capital letters, I use a rolling motion where I activate a layer with my thumb, hold down the shift key with the middle finger of the same hand, release my thumb, and hit a letter with my other hand. Once I got used to the rolling motion, I added the rest of the modifier keys. I’m not sure if it’s intended functionality, but I’m glad it works.
There are a lot of cases where multiple modifiers have to be held down to do stuff. Window managers, terminal multiplexers, and Emacs come to mind immediately. It’s nice to have access to the modifier keys without playing with a bunch of timeout settings.
Still a work in progress
I’m happy with my current setup, but there’s still room for improvement. There’s a bunch of stuff I want to try, and loads of settings I haven’t messed with yet. I look forward to writing about future tweaks and improvements.